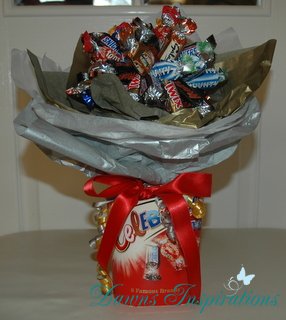
This is a quick tutorial that will help you turn a ordinary box of assorted chocolates into a beauitful bouquet a chocolates to give away as a gift.
This is a quick tutorial that will help you turn a ordinary box of assorted chocolates into a beauitful bouquet a chocolates to give away as a gift.
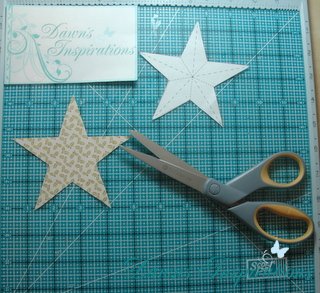
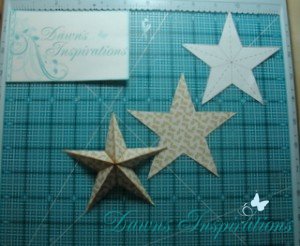
A Quick Tip to show you how to make 3D Paper Stars.
Cut out an equal 5 pointed star on to your chosen paperned paper, this can be of any size.
Using a score board, score each point of the star from the tip to the bottom of the point.
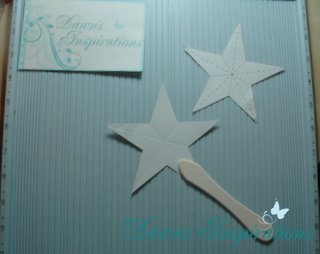
Now go ahead and burnish all your score lines.
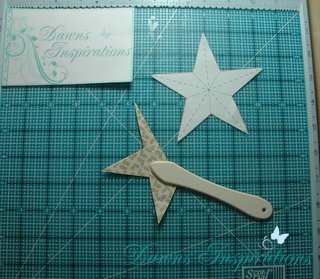
Fold the star in on itself so you have mountain and valley folds. Mountains for the large points and valley for the end points.

Using an ink pad, ink all the score lines as this makes your finsihed star look more 3D
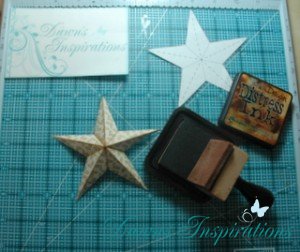
Your 3D star is now ready to be used on your chosen projects.
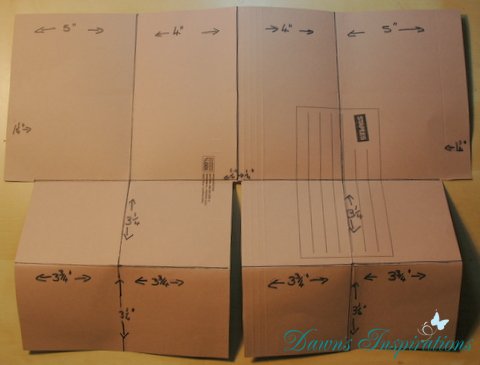
This great Gatefold Tri Shutter Album is different to most as overall it measures 8×8 inches and allows you to add photos printed off the Picasa (Photo Software Management System) without the need to cut them down.
I have used UK A4 cardstock and you will need 5/6 sheets. You can use 12×12 card stock if you wish.
Now watch the Video Tutorial and make you Gatefold Tri Shutter Mini Album along with me as I will give you step by step instructions of how to make this very interesting project.
Your will need to cut your chosen card stock to the following sizes;
1 @ 8″x8″
1 @ 8″x4″
2 @ 8″x5 3/4″ – score this on the short side at 4″.
2 @ 8×11 1/2″ – score this on the long side at 2″, 4″, 8″ & 10″
Then score the short side at 2 1/2″ & 5 1/2″.
Thank you for watching and I do hope you have enjoyed this Mini Album project?
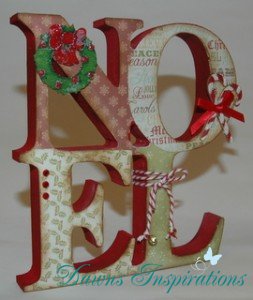
This is a beautiful Noel Plaque I have made to decorate my home with this Christmas.
The base is MDF and I got it from the MDFMan here in the UK. I have then given it a couple of coats of red acrylic paint. Once this is dry I then traced round the letters on christmas scrapbooking paper and cut these out.
Next I stuck the letters onto the main base using PVA glue, slightly over lapping these. Once this was dry I lightly sanded around the edges of the letters with a very fine grade sand paper. Then using Vintage Photo distress ink, I inked around the edges of the letters and also the main MDF base, this is to give it a more vintage feel and take that just painted look off the project.
Next I went through my crafty stash to look for suitable embellishments to finish off the project. Just using tiny jingle bells and bakers twine gives it a finished look. The wreath and candy canes are wooden embellishments which have been coloured with promarkers and finshed of with a little bit of glitter. Then to finish it all off some adhesive gems.
This Flip Style Mini Scrapbook Tutorial shows you how to make two mini scrapbook albums that will house your 6×4 photos. Each album can hold ten 6×4 photos and stands nicely as book. This project is great as a gift as the recipientcan just add their photos with cutting them down.
You will need 3 sheets of A4 card stock and patterned paper to decorate, embellishments are optional.
Cut 2 sheets of the cardstock to measure 10 1/4″ x 6 1/2″. Then score these at 4 1/2″ – 4 3/4″- 9 1/4″ – 9 1/2″ on the longside.
Cut 1 sheet of cardstock to measure 10″ x 6 1/2″. Then score at 4 1/2″ and 5 1/2″on the longside.
Cut a strip 3/4″ x 6 1/2″ to reinforce the spine.
Now you can watch the video to see how to put the album together.
You will need 5 sheets of A4 card stock and patterned paper to decorate, embellishments are optional.
Cut 1 sheet of card stock to measure 10″ x 6 1/2″. Then score at 4 1/2″ and 5 1/2″on the longside.
Cut 4 sheets of card stock at 8 1/2″ x 6 1/2″. the score at 4 1/4″ on the longside.
Cut a strip of 3/4″ x 6 1/2″ to reinforce the spine.
Now you can watch the video to see how to put the album together.
I do hope you have enjoyed this Mini Scrapbook Tutorial and please leave me a comment as it is always nice to hear from my fellow crafters.
With this Online Workshop Video Tutorial and PDF you too can create this beautiful Christmas Mini Album. I will make this album with you Step by Step so together even a new crafter will be able to create this beautiful project.
The online workshop runs for about 2 hours and I am doing the project with you every step of the way. So gather all your tools together and you too can complete this beautiful mini album in next to NO TIME at all.
Make your own christmas decorations using MDF Stars.
If you can not get hold of MDF Stars you can always use thick mount board or chipboard, these can be layed together to give a similar affect.
I got my MDF Stars from MDFMan he is based in the UK and attends alot of the craft shows.
Today I did a scrapbook layout for the Edwinstowe Scrappers Club Challenge. This months challenge is to use a craft item in a layout that you have never or have not used for a long time, you also needed to have some washi tape on the layout too.
Well here is my layout for the challenge. Using a craft CD and printed out my papers on normal copy paper as I have never used CD crafting on a scrapbook layout before. I then made my own washi tape to match in with my project, you can see my tutorial for this on the website.
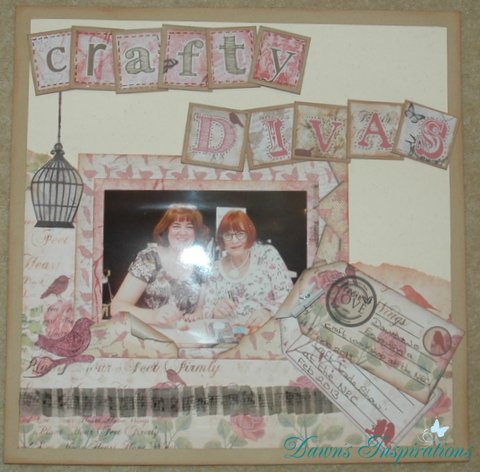
I hope I have now inspired you to go ahead and use your craft CD’s for scrapbooking too?
Here is the another File Folder Mini Album Tutorial I am calling this Style 2.

A quick project that can be done in no time and with my step by step help you too can make this beautiful album.
Using a few supplies – 1 office file folder, I sheet 12×12 Kraft card stock, a free paper pack from a craft magazine and some ribbon.
Measurements;
Here is a picture of the measurements and what you file folder should look like before you put it all together.
Tags 4 3/4″ x 2 3/8″ – Mats for tags 2 1/4″ x 3 3/4″
Photo Mats 6″ x 3 1/2″ – Mats for photo mats 5 3/4″ x 3 1/4″
Patterned Paper Mats for this project using a 6×6 inch paper pad;
Two of 6″ x 4 3/4″
Two of 6″ x 3 3/4″
Four of 3 1/2″ x 3 1/4″
Back and front covers – two 6 1/2″ x 4 3/4″
You can follow the video tutorial to make the rest of the project. Don’t forget if you are not using 6×6 papers you adjust the size of the paper mats behind your pockets.
I do hope you enjoy this project and I would love to know how you get on.
This Mini Scrapbook Album makes a beautiful gift to share with family and friends..
Washi Tape is a great product but it can be limiting as you have a whole roll of the same colour/design and you may only use a small amount on a scrapbook layout or project.
I will show you how to make your own washi tape in very little time and with a a few supplies. This way you can make the amount that you need and in a colour and design that suits your scrapbook layout or project.
In this Step by Step Tutorial I not only show you how to decorate a MDF Box but you will learn how to make and decorate a Mini Scrapbook Album to go inside your MDF Box.
This makes a lovely gift or just to keep for yourself.
Cut 2 sheets of 12 x 12 cream cardstock to measure 12 x 5 1/2 .
With the 12 inch side along the top score each page as follows;
Page 1/Cover; Score at 4″ and 5″ (this is the spine) 9 1/4″ & 10 1/4″ (this is your wrap around cover)
Page 2: Score at 3″ (Flap) 7″ & 8″ (this is your spine)
Page 3; score at 4″ and 4 3/4″ (this is your spine) & 83/4″ (Flap)
Page 4; Score at 31/2″ (Flap) 71/2″ & 8″ (this is the spine)
Fold all the score line and stack in order on top of one another.
Each page will have a natural spine and a flap. We will attach double sided tape to the back of each spine (But NOT THE FRONT COVER/PAGE1).so theystack on top of one another and this is called a stacking the deck spine system.
If your box measures a different size you can adjust the height of your book to fit but keep the 12 inch measurement the same and score and fold in the same way.
The MDF Box came from MDFMan He is based in the UK and attends lots of the craft shows.
You can follow the video tuorial now to make the rest of the project. I do hope you enjoy this project as it makes a beautiful gift.
This video tutorial shows you how to create an Exploding Box. I give you step by step instructions of how to make the box and decorate it even down the the finishing touches of how to make the paper bow and large paper flower.
To make the Box you will need 4 sheets of 12×12 card stock.
You will need another sheet to make the Tags and also some pattrened paper to decorate approximately 5 sheets of 12×12.
I used a Scrapbooking kit from www.scrapbookingkitsrus.co.uk to make this project. http://scrapbookingkitsrus.co.uk/kits-for-sale/2013-retreat-annalee-kit/
One sheet of 12×12 card score at 4″ and 8″. Then do a quarter turn and score at 4″ and 8″ again.
Cut 8 patterned paper mats measuring 3 3/4″ x 3 3/4″
Cut card 7 1/4″ x 7 1/4″
Then score at 1 1/2″ and 5 3/4″
Cut a patterned paper mat measuring 4″ x 4″. Plus 4 mats measuring 42 x 1 1/4″ for the sides of the lid.
Make a paper bow use the template from the internet ( search for DCWV Paper Bows and download the template)
Cut card 11 3/4″ x 11 3/4″
Then score at 4″ and 7 1/2″. Then do a quarter turn and score again at 4″ and 7 3/4 “.
Cut 8 patterned paper mats measuring 3 1/2″ x 3 1/2”
Tags – Cut 4 tags measuring 3 1/2″ x 3 3/4″. Plus 4 patterned paper mats for the tags of 3 1/2″ x 3 1/4″.
Cut card 11 1/2″ x 11 1/2″
Then score at 1/2″ and 4″. Then do a quarter turn and repeat score lines, do this on each quarter turn.
Cut 8 patterned paper mats measuring 3″ x 3 3/4″
Tags – Cut 4 tags measuring 3 1/4″ x 3 3/4″. Plus 4 patterned paper mats for the tags of 3 1/2″ x 3″.
Cut a mat from card stock of 3 1/4″ x 3 1/4″. Then make your flower to go on top of this mat as your centre piece. I used the Tim Holtz Tattered Foral Die and cut 4 of the large flowers.