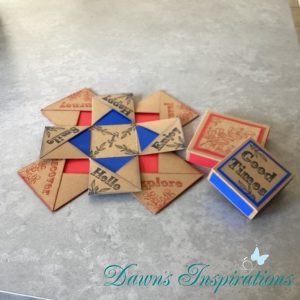
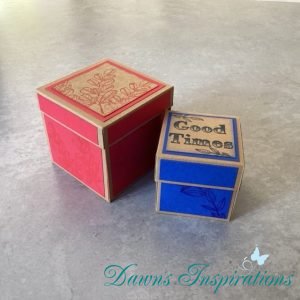
These Two sizes of Exploding Boxes fit so nicely nested together and can be used to hold photos or as a change from a standard birthday card.
You may have seen me demonstrate these on the Pink Frog Create & Craft TV Show. I have given you both imperal and metic measurments so you can create your own.
Imperal Version – Large Exploding Box
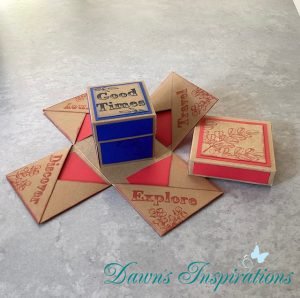
- Box Base – Take 12″ x 12″ Card and score at 4″ & 8″ and then do a quarter turn and score again at 4″ & 8″ and burnish your score lines.
- Then draw a diagonal line on each corner square from the corner point to the centre square and cut the lines.
- You fold 2 triangles over the squares on each side to create the pocket, only attaching tape or glue on the bottom line.
- Decorate your Box Base.
- Box Lid – Cut card at 8 1/8″ x 8 1/8″ and score in at 2″ on all 4 sides and burnish.
- Decorate your Box Lid before gluding together.
- Snip small wedges out of the corner squares so when gluing your box lid together the corners look neat.
- Decorative Mats
- Photo Mats – 3 1/2″ x 3 1/2″
- Outside side panels of Box Base – 3 1/2″ x 3 1/2″
- Box Lid side mats – 1 3/4″ x 3 1/2″
- Box Lid Top – Base Mat 3 3/4″ x 3 3/4″ and Top Mat 3 1/4″ x 3 1/4″
Imperal Version – Small Exploding Box
- Box Base – Take 9″ x 9″ Card and score at 3″ & 6″ and then do a quarter turn and score again at 3″ & 6″ and burnish your score lines.
- Then draw a diagonal line on each corner square from the corner point to the centre square and cut the lines.
- You fold 2 triangles over the squares on each side to create the pocket, only attaching tape or glue on the bottom line.
- Decorate your Box Base.
- Box Lid – Cut card at 5 6/8″ x 5 6/8″ and score in at 1 1/4″ on all 4 sides and burnish.
- Decorate your Box Lid before gluding together.
- Snip small wedges out of the corner squares so when gluing your box lid together the corners look neat.
- Decorative Mats
- Photo Mats – 2 1/2″ x 2 1/2″
- Outside side panels of Box Base – 2 3/4″ x 2 3/4″
- Box Lid side mats – 1 ” x 2 3/4″
- Box Lid Top – Base Mat 2 3/4″x 2 3/4″ and Top Mat 2 1/2″ x 2 1/2″
Metric Version – Large Exploding Box
- Box Base – Take 30cm x 30cm Card and score at 10cm & 20cm and then do a quarter turn and score again at 10cm & 20cm and burnish your score lines.
- Then draw a diagonal line on each corner square from the corner point to the centre square and cut the lines.
- You fold 2 triangles over the squares on each side to create the pocket, only attaching tape or glue on the bottom line.
- Decorate your Box Base.
- Box Lid – Cut card at 15.2cm x 15.2cm and score in at 2.5cm on all 4 sides and burnish.
- Decorate your Box Lid before gluding together.
- Snip small wedges out of the corner squares so when gluing your box lid together the corners look neat.
- Decorative Mats
- Photo Mats – 8.5cm x 8.5cm
- Outside side panels of Box Base – 9cm x 9cm
- Box Lid side mats – 2cm x 9cm
- Box Lid Top – Base Mat 9cm x 9cm and Top Mat 8cm x 8cm
Metric Version – Small Exploding Box
- Box Base – Take 22.5cm 22.5cm Card and score at 7.5cm & 15cm and then do a quarter turn and score again at 7.5cm & 15cm and burnish your score lines.
- Then draw a diagonal line on each corner square from the corner point to the centre square and cut the lines.
- You fold 2 triangles over the squares on each side to create the pocket, only attaching tape or glue on the bottom line.
- Decorate your Box Base.
- Box Lid – Cut card at 13.7cm x 13.7cm and score in at 3cm on all 4 sides and burnish.
- Decorate your Box Lid before gluding together.
- Snip small wedges out of the corner squares so when gluing your box lid together the corners look neat.
- Decorative Mats
- Photo Mats -6.5cm x 6.5cm
- Outside side panels of Box Base – 6.5cm x 6.5cm
- Box Lid side mats – 2.5cm x 7cm
- Box Lid Top – Base Mat 7cm x 7cm and Top Mat 6.5cm x 6.5cm