Dawn's Inspirations

  • Shop
  • Cart
  • Account
You Are Here: Home > Free Tutorials

One Sheet Invitation idea

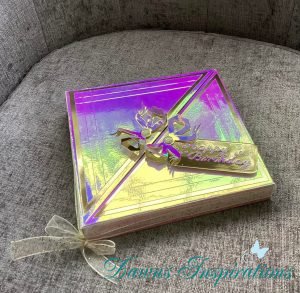
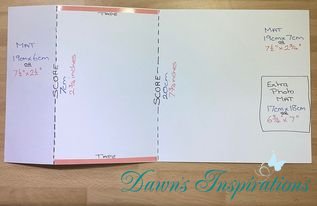
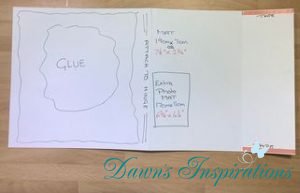
Using just one sheet of Pink Frog speciality A3 card I made this one sheet invitation. with the pocket you have plenty of room to add extra cards of information. this idea would work well for many occasions. I demonstrated this on Create and Craft TV during the Pink Frog Card and Crafts Show.

Here is my step by step video with all the measurements you will need.

Filed Under: Cards, Free Tutorials, Off the Page Projects

Double Triangle Gift Box

You to can make beautiful stunning gift boxes like this! with just a couple of sheets of A3 Card, I used the Pink Frog A3 card as this is great quality for construction projects.
I have put together a quick step by step video with all the measurements and know how you need to make up your own. so grab your supplies and have fun.

Filed Under: Free Tutorials, Off the Page Projects

Box in a Box – Gift Box

How to make this super quick and easy Box in a Box -Gift Box. Ideal for any occasion and makes even less expensive gifts look fabulous.
you make have seen me demonstrate this on Create & Craft TV and many of you have asked to see it again so see the video below for measurements and how to put this together.

The card and products used in this project are from Pink Frog Card & Crafts 

Filed Under: Free Tutorials, Off the Page Projects

Exploding Boxes

These Two sizes of Exploding Boxes fit so nicely nested together and can be used to hold photos or as a change from a standard birthday card.

You may have seen me demonstrate these on the Pink Frog Create & Craft TV Show. I have given you both imperal and metic measurments so you can create your own.

Imperal Version – Large Exploding Box 

  • Box Base – Take 12″ x 12″ Card and score at 4″ & 8″ and then do a quarter turn and score again at 4″ & 8″ and burnish your score lines.
  • Then draw a diagonal line on each corner square from the corner point to the centre square and cut the lines.
  • You fold 2  triangles over the squares on each side to create the pocket, only attaching tape or glue on the bottom line.
  • Decorate your Box Base.
  • Box Lid – Cut card at 8 1/8″ x 8 1/8″ and score in at 2″ on all 4 sides and burnish.
  • Decorate your Box Lid before gluding together.
  • Snip small wedges out of the corner squares so when gluing your box lid together the corners look neat.
  • Decorative Mats 
  • Photo Mats – 3 1/2″ x 3 1/2″
  • Outside side panels of Box Base – 3 1/2″ x 3 1/2″
  • Box Lid side mats – 1 3/4″ x 3 1/2″
  • Box Lid Top – Base Mat 3 3/4″ x 3 3/4″ and Top Mat 3 1/4″ x 3 1/4″

Imperal Version – Small Exploding Box 

  • Box Base – Take 9″ x 9″ Card and score at 3″ & 6″ and then do a quarter turn and score again at 3″ & 6″ and burnish your score lines.
  • Then draw a diagonal line on each corner square from the corner point to the centre square and cut the lines.
  • You fold 2  triangles over the squares on each side to create the pocket, only attaching tape or glue on the bottom line.
  • Decorate your Box Base.
  • Box Lid – Cut card at 5 6/8″ x 5 6/8″ and score in at 1 1/4″ on all 4 sides and burnish.
  • Decorate your Box Lid before gluding together.
  • Snip small wedges out of the corner squares so when gluing your box lid together the corners look neat.
  • Decorative Mats 
  • Photo Mats – 2 1/2″ x 2 1/2″
  • Outside side panels of Box Base – 2 3/4″ x 2 3/4″
  • Box Lid side mats – 1 ” x 2 3/4″
  • Box Lid Top – Base Mat 2 3/4″x 2 3/4″ and Top Mat 2 1/2″ x 2 1/2″

Metric Version – Large Exploding Box 

  • Box Base – Take 30cm x 30cm  Card and score at 10cm & 20cm  and then do a quarter turn and score again at 10cm & 20cm and burnish your score lines.
  • Then draw a diagonal line on each corner square from the corner point to the centre square and cut the lines.
  • You fold 2  triangles over the squares on each side to create the pocket, only attaching tape or glue on the bottom line.
  • Decorate your Box Base.
  • Box Lid – Cut card at 15.2cm x 15.2cm and score in at 2.5cm on all 4 sides and burnish.
  • Decorate your Box Lid before gluding together.
  • Snip small wedges out of the corner squares so when gluing your box lid together the corners look neat.
  • Decorative Mats 
  • Photo Mats – 8.5cm x 8.5cm
  • Outside side panels of Box Base – 9cm x 9cm
  • Box Lid side mats – 2cm x 9cm
  • Box Lid Top – Base Mat 9cm x 9cm  and Top Mat 8cm x 8cm

Metric Version – Small Exploding Box 

  • Box Base – Take 22.5cm 22.5cm Card and score at 7.5cm & 15cm and then do a quarter turn and score again at 7.5cm & 15cm and burnish your score lines.
  • Then draw a diagonal line on each corner square from the corner point to the centre square and cut the lines.
  • You fold 2  triangles over the squares on each side to create the pocket, only attaching tape or glue on the bottom line.
  • Decorate your Box Base.
  • Box Lid – Cut card at 13.7cm x 13.7cm and score in at 3cm on all 4 sides and burnish.
  • Decorate your Box Lid before gluding together.
  • Snip small wedges out of the corner squares so when gluing your box lid together the corners look neat.
  • Decorative Mats 
  • Photo Mats -6.5cm x 6.5cm
  • Outside side panels of Box Base – 6.5cm x 6.5cm
  • Box Lid side mats – 2.5cm x 7cm
  • Box Lid Top – Base Mat 7cm x 7cm and Top Mat 6.5cm x 6.5cm

Filed Under: Free Tutorials, Off the Page Projects

One Hour 8×8 Mini Album

This One Hour 8×8 Mini Album is a fantastic Super Quick Project! Deciding on your papers will take you longer. This Mini Album will hold 36 6×4 photos so idea for keepsake gift giving.

Supplies you will need are;

11 x A4 Cardstock at least 250 – 300gsm

2 Grey Board

21 sheets of 8×8 Patterned Papers

Tools needed ;

Scoreboard

Paper Trimmer

Bone Folder

Glue

Dies for cutting decorative edges optional

This hinge system is great as your project lays nice and flat while you view the pages.

Now gather your supplies and Craft along with me in real time so you can also make your own 8×8 in an Hour.

Card cut at;

1 at 8 1/4″ x 8 1/2″ OR 21cm x 22cm

9 at 8 1/4″ x 10″ OR 21cm x  25.5cm Score at 8 1/4″ & 8 1/2″ OR 21cm & 21.5cm on the long side.

1 at 8 1/4″ x 7″ OR 21cm x 18cm Score at 2 1/4″ OR 5.75cm in on both ends on the short side.

Cut Grey board at;

2 at 8 1/4″ x 8 1/2″

Patterned Papers;

20 at 8″ x 8″

1 x for decorative edges of your wrapped hinge.

If you fancy trying the 6×6 original version here is the link https://dawnsinspirations.com/1-hour-6×6-mini-album/

Filed Under: Free Tutorials

New Page Style for your 6×6 & 8×8 Memory Books from Pink Frog

If you are loving your 8×8 and 6×6 Memory Books using the Memory Book Kits from Pink Frog, why not try out this New Page Style to give your Memory Books a totally different look and the great thing is you can do with without buying any extra cardstock to go with these fabulous Memory Book Kits from Pink Frog.

I have also given you all the measurements in Inches and Centimetres so you choose which you like to work in.

8×8 Memory Book 


PLUS the Step by Step Videos for both sizes of Memory Books.

Centimetres 8×8 Memory Book 

Inches 8×8 Memory Book 

6×6 Memory Book


PLUS the Step by Step Videos for both sizes of Memory Books.

Centimetres 6×6 Memory Book

Inches 6×6 Memory Book 

Memory Book Kits are available here https://www.pinkfrogcraftsandcards.co.uk/pink-frog-crafts-memory-book-kits-314-c.asp and come in 8×8 and 6×6 Size.

With each Kit you can make 4 Memory Books and they come will full instructions and Cutting/Scoring Guide.

If you prefer a Step by Step Video to go with your Kits this is also available here https://dawnsinspirations.com/shop/8-8-memory-book/

Filed Under: Free Tutorials, Tips and Techniques

How to make a quick Concertina Mini Album


This super quick project is perfect when you fancy an couple of hours crafting making a project from start to finish. I used the 15cm x 42cm Card stock from Pink Frog.

This gives a nice size for adding 6″ x 4″ photos in so a good size Mini Album. Making them perfect for give giving as they holding 14 photos.

So gather your supplies and let make this super cute Concertina Mini Album.

Cover

  • Cut one card at 41cm x 15cm (16 1/2″ x 5 7/8″) and score in at 20cm (8 1/2″) at both ends on the long side.

Pages

  • Cut one at 20cm x 15cm (8 1/4″ x 5 7/8″) and score at 18cm (7″) on the long side.
  • Cut 5 at 20cm x 15cm ( 8 1/4″ x 5 7/8″) and score on at 2cm (3/4″) on long side at both ends.

Decorative Mats Outside Cover

  • Cut 2 at 19cm x 14cm (7 3/4″ x 5 1/2″)
  • Cut 1 at .75cm x 14cm (3/8″ x 5 1/2″

Decorative Mats Inside Cover

  • Cut 1 at 19cm x 14cm ( 7 3/4″ x 5 1/2″)
  • Cut 2 at 17cm x 14cm ( 6 3/4″ x 5 1/2″)
  • Cut 1 at 1.5cm x 14cm (5/8″ x 5 1/2″)

Decorative Mats Page Mats 

  • Cut 11 at 1.5cm x 14cm (5/8″ x 5 1/2″)
  • Cut 11 at 15cm x 14cm ( 6″ x 5 1/2″)

I love seeing what you make so please feel free to share over on my Facebook Page.

Filed Under: Free Tutorials

3 How To Make Presentation Boxes Ideas

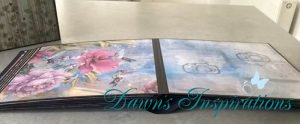
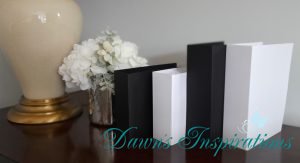
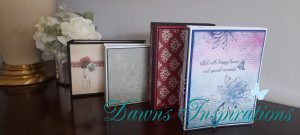
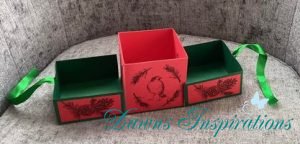
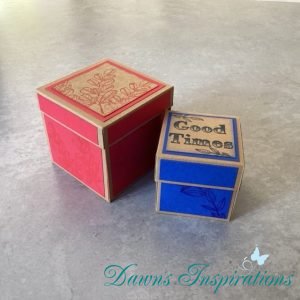
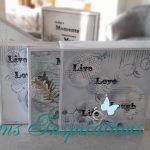
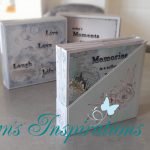
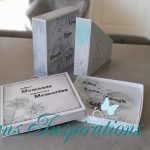
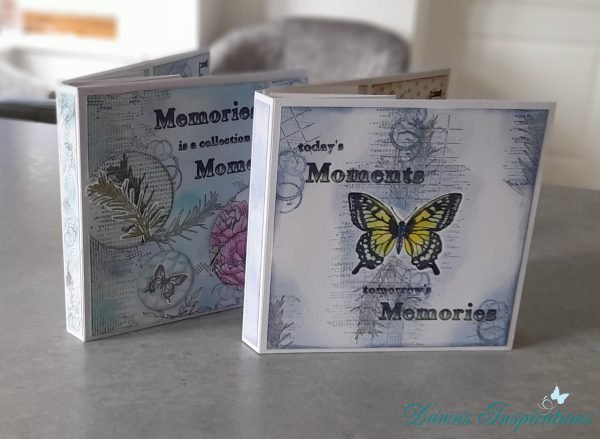
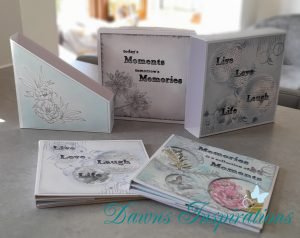
Here are 3 different ideas to use as Presentation Boxes or Storage for your Foto Folios & Size 8 Memory Folios .

The Slip Cover, The File Box and the Presentation Box are fabulous ways of taking your Foto Folio & Memory Folios to another level.

Not only I filmed you a Step by Step Video Tutorials but I have also created PDFs in both Inches and Centimetre Versions for you to print off and keep.

Metric Cutting & Scoring Guide

Imperial Cutting & Scoring Guide

I do hope you enjoy these super quick How To projects?


Slip Cover

File Box 

Presentations Gift Box

Filed Under: Free Tutorials, Workshop Tutorials

Size 8 Memory Folio


Here is my Size 8 Memory Folio and some ideas of how you can decorate your own. These are a great size if the thought of a 12×12 Memory Folio feels a bit big for you to start with.

Kits are available from Pink Frog Crafts https://www.pinkfrogcraftsandcards.co.uk/size-8-memory-folio-kit—watercolour-8633-p.asp

My Online Workshop for this Size 8 Memory Folio is available here https://dawnsinspirations.com/shop/size-8-memory-folio/

The Memories & Moments Word Stamps you can buy here https://www.pinkfrogcraftsandcards.co.uk/memories–moments-a5-clear-stamp-set-8582-p.asp

Filed Under: Free Tutorials

BONUS Double Pocket Page for Landscape Memory Book

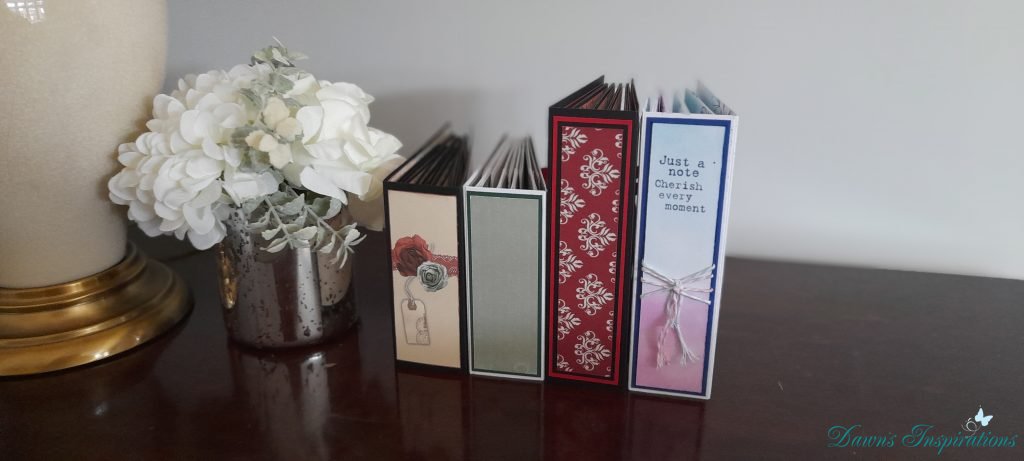
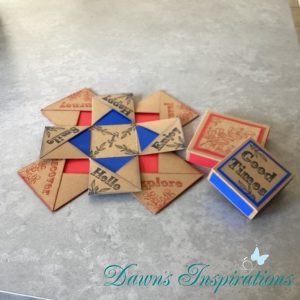
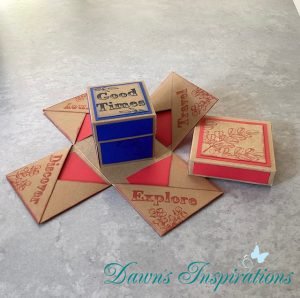
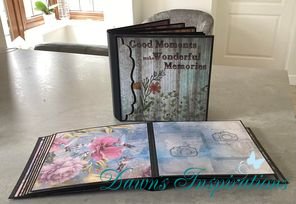
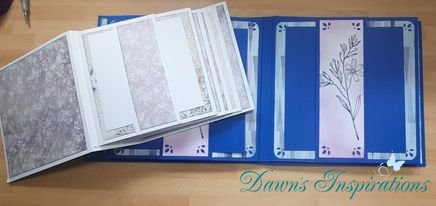
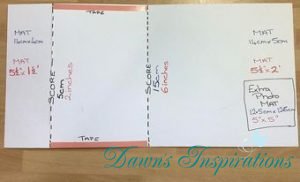
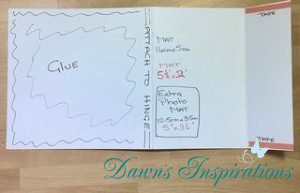
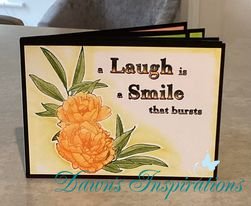
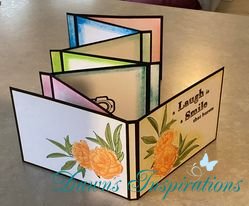
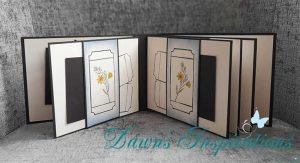
Here is a new page fold you can choose to add to your Large Landscape Portrait Memory Books. You could also create new Landscape Memory Books by using the same cover and hinge measurements but by adding this new page for a totally new look.


You will see below I have filmed a Step-by-Step Instructional Video for you to follow. For convenience, I have filmed 2 videos, one in metric for those who like to use centimetres, and the other in imperial for those of us who choose to use inches.

I first shared this idea on the Craft Show on 22nd November 2021.
If you would like to do the tutorials, click here and I will take you Step-by-Step through putting it together

Metric – centimetre version

Imperial – inches version

Filed Under: Free Tutorials

Landscape/Portrait Memory Book

This Landscape/Portrait Memory Book Bundle from Pink Frog is Great! It comes in Medium and Large sizes too!

They make your Main Memory Books and then you can use your creativity to decorate them as you wish so they can be used for many occasions or to store memorabilia in

How to make the Landscape Version of your Memory Books

How to make the Portrait Version of the Memory Books.

You will find everything I have used here;
Large Landscape/ Portrait Memory Book Bundle here https://bit.ly/3qI3sRR
Medium landscape/portrait memory Book Bundle https://bit.ly/3wb8A1Y
Red Liner Tape https://bit.ly/3jqcr8z
EVA Glue https://bit.ly/3du7Yhw
Anti Clogging – Fine Nozzle Glue Bottles https://bit.ly/3hmFzLk
Teflon Bone Folder https://bit.ly/3hhDpgc

So you can make your Own Memory Books and use your own creativity to turn them to this.

Filed Under: Free Tutorials

8×8 Gatefold Trifold Mini Album


This gorgeous 8×8 Gatefold Trifold Mini Album is the perfect Keep Sake Mini Album.
This has been made as a sample for the up and coming Pink Frog One Day Special Shows over on Hochanda TV Friday 12th March 2021 until Saturday 13th March 2021.
I have used the Pink frog 20cm x 40cm Super Smooth Cardstock and the Brand New Spring Flowers and Typewriter Sentiments Stamps.

The Album itself is really quick to make so gather your supplies and lets make this super quick Mini Album.

The measurements are,

Cut one sheet of card at 20cm so you have 2 pieces of 20cm x 20cm.
Score another piece of card at 9cm & 10cm on either end and burnish the score lines.
Now stick the 2 square of card to the flaps on each end of the piece you have just scored, this is your cover.
Take the next 3 sheets of card and score each one at each end in 10cm and burnish the score lines.
Watch the video if you wish to add the shaped pockets to your project.
Once you have cut shapes (optional) you can stick the 2 end flaps of the centre card to the out side ones.
now stick the middle large panel to the cover you have created.
Attach your ribbon fastening and you are ready to decorate.

Decorating your Album with Patterned Papers.

Patterned Paper sizes.
Large panels are 19cm x 19cm
Small panels are 9cm x 19cm
to cut shaped pockets see my video as I show you 2 different techniques to do this.

Filed Under: Free Tutorials

  • « Previous Page
  • 1
  • …
  • 3
  • 4
  • 5
  • 6
  • 7
  • …
  • 13
  • Next Page »
  • My Account

Copyright © 2025 · Dawns Inspirations ·