Dawn's Inspirations

  • Shop
  • Account

Archives for 2015

Spectrum Noir Aqua Tints – Sponging

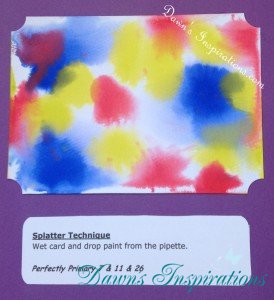
Sponging with Aqua Tints

Supplies

Spectrum Noir Aqua Tints

Watercolour Card

Sponge – diferent types of sponges give a different finish.

Select some coordinating colours, using a sea sponge, dab into the paint and blot onto your card.
You can do this on either wet card or dry for 2 different effects.

Filed Under: Tips and Techniques

Spectrum Noir Aqua Tints – Faux Bleaching

Faux Bleaching

Supplies

  • Spectrum Noir Aqua Tints
  • Watercolour Card or Sheena’s Stamping Card
  • Large Flat brush
  • Kitchen paper


Once you have created a background on your card using Aqua Tints, you can then give this a faux bleached effect by sprinkling drops of water on top. Then leave it for a few seconds and dab off with kitchen paper – you’ll love the effect!

Filed Under: Tips and Techniques

Spectrum Noir Aqua Tints – Seamless Blending

Seamless Blending

Supplies

  • Spectrum Noir Aqua Tints
  • Sheena’s Stamping Card or Smooth Card
  • Liquid Glycerine
  • Cut’n’Dry Foam

Just add a few drops of glycerine on a craft mat and a few drops of Aqua Tints.

Using the Cut & Dry Foam, mop up the glycerine first then the aqua tint and paint gently rubbing over the paper. You can repeat this with different colours for the desired effect.

Filed Under: Tips and Techniques

Spectrum Noir Aqua Tints – Shaving Foam Technique

Shaving Foam Technique
Supplies

  • Spectrum Noir Aqua Tints
  • Watercolour Card
  • Cheap Shaving Foam
  • Ruler

Spray cheap shaving foam on your craft mat and add a few drops of Aqua Tints in at least 2 colours.

Swirl with a pokey tool and lay the card on top – you may be lucky enough to get several prints from one application.

This is so much fun and something even the children will enjoy doing so go on, get the kids to create projects with you and have lots of fun.

Filed Under: Tips and Techniques

Spectrum Noir Aqua Tints – Clingfilm Effect

Clingfilm Effect

Supplies

Spectrum Noir Aqua Tints

Watercolour Card

Large Flat brush

Household Clingfilm

Put a water wash over the paper then add 3 -4 aqua tint colours – these will blend but you can also help this with the use of a wet brush.

Crumple up some cling film and lay this on the card and set this aside to dry naturally.

Once dry, peel off the cling film to see the effect. This is a unique technique as each time you do it NO two will look the same!

Enjoy!!


Filed Under: Tips and Techniques

Spectrum Noir Aqua Tints – Splatter Effect

Splatter Effect

Supplies

  • Spectrum Noir Aqua Tints
  • Watercolour Card
  • Large Flat Brush

IMG_1588

Wet your watercoulour card with the large flat brush and water. Using the pipettes from your Spectrum Noir aqua Tints sets, pick your chosen colours and drop these on to the wet card. By dropping the tint from different levels you can get different looks. You can also use this technique on dry card too for another look.

This technique will take you back to your childhood so go on have some fun and play.

Filed Under: Tips and Techniques

Spectrum Noir Aqua Tints – My Crystal Technique

Crystal Technique

Supplies

  • Spectrum Noir Aqua Tints
  • Acetate
  • Clear varnish
  • Glitter – fine
  • Stamp – use Staz-On ink to stamp on acetate
  • Paper Napkin or kitchen roll


Take a piece of acetate and drop puddles of floor wax or clear varnish.
Now add some different colours of your Aqua Tints and swirl into the wax.
Add glitter if you wish.
Cover with 1 ply of kitchen paper and leave to dry over night.

Filed Under: Tips and Techniques

Spectrum Noir Aqua Tints- Straw Effect

Straw Technique

Supplies

  • Spectrum Noir Aqua Tints
  • Watercolour Card or Sheena’s Stamping Card
  • Household  drinking straw

This can be done on wet or dry card for 2 different effects. Drop aqua tint on card and blow through a drinking straw to move it around the card.


Filed Under: Tips and Techniques

Spectrum Noir Aqua Tints – Salt Effect

Salt Effect Using Spectrum Noir Aqua Tints

Supplies

Spectrum Noir Aqua Tints

Watercolour Card

Large Flat brush

Salt – different salts give different effects – try table, rock or seasalt.

Put a water wash over the paper then add 3 -4 aqua tint colours – these will blend but you can also help this with the use of a wet brush.

Now sprinkle salt on the paper and set this aside to dry naturally for at least one hour. Once dry rub the salt away to see the effect.

Note effects from different types of salt (Sea salt- Rock Salt – Table salt)

Filed Under: Tips and Techniques

Spectrum Noir Aqua Tinits – Wet on Wet Effect

Wet on Wet or Graduated Wash Effect using Spectrum Noir Aqua Tints.

Supplies

  • Spectrum Noir Aqua Tints
  • Watercolour card
  • Large Flat Brush

Wet your card with water using your large flat brush. Then load your brush with your chosen Aqua Tints Colour.

The Aqua Tint stripe across the card to give a colour wash. You can graduate the colour too using this technique.

Filed Under: Tips and Techniques

Spectrum Noir Aqua Tints – Colour Wash Effect

I have used the following supplies to achieve effect in this Colour Wash tip.

Watercolour Card
Large flat brush

With a large flat brush, wet your watercolour card with water. Using your chosen colours, paint lines across the paper. You can use many different colours as they will start to blend; you can do this many times as you like to build colours and give you a washed effect.

Filed Under: Tips and Techniques

Bouquet of Chocolates in a Handmade Box

Many of you have enjoyed my Bouquet of Chocolates YouTube Video Tutorial however, as I have subscribers from all over the world I am aware that you can not get the same boxes of chocolates that I have used so this is why I have come up with this new video tutorial.

0165fe6ffab889d43583bd7141dce23275a66ca37301be609527535ce5f4565f3905b2695fa97122695f

01da349bb4077cd47faf42a4ac33255e293939e2af

In this Video Tutorial I show you how to make a box from one sheet of 12 x 12 inch cardstock and some patterned paper to decorate.

This way you can make this project even using sweets or chocolates out of a packet as long as they have wrapper ends for you to attach to the sticks.

Here is what your 12×12 inch cardstock should look like.

01be50be456119cf72b60c76b42388231ca1591014The thank you die is from Crafters Companion – Die’sire Only Words Classiques Collection.

Filed Under: Off the Page Projects

  • « Previous Page
  • 1
  • 2
  • 3
  • 4
  • 5
  • Next Page »
  • My Account

Copyright © 2025 · Dawns Inspirations ·